AWS Amplify Gen 2 handles standard data operations surprisingly well. You define a model in TypeScript, configure authorization, deploy the backend, and Amplify gives you the common create, read, update, and delete operations without requiring you to write individual GraphQL resolvers.For example, you can define a model such as Post, deploy the backend, and immediately start creating, listing, updating, and deleting posts without writing individual GraphQL resolvers yourself.
The interesting part starts when the application needs an operation that does not map cleanly to generated CRUD. Imagine that you want to add a likePost mutation. It should receive a post ID, atomically increment the likes value in DynamoDB, and return the updated post.You could create a Lambda function for that operation. But the logic is small, it talks to one DynamoDB table, and AppSync already has a connection to that table.
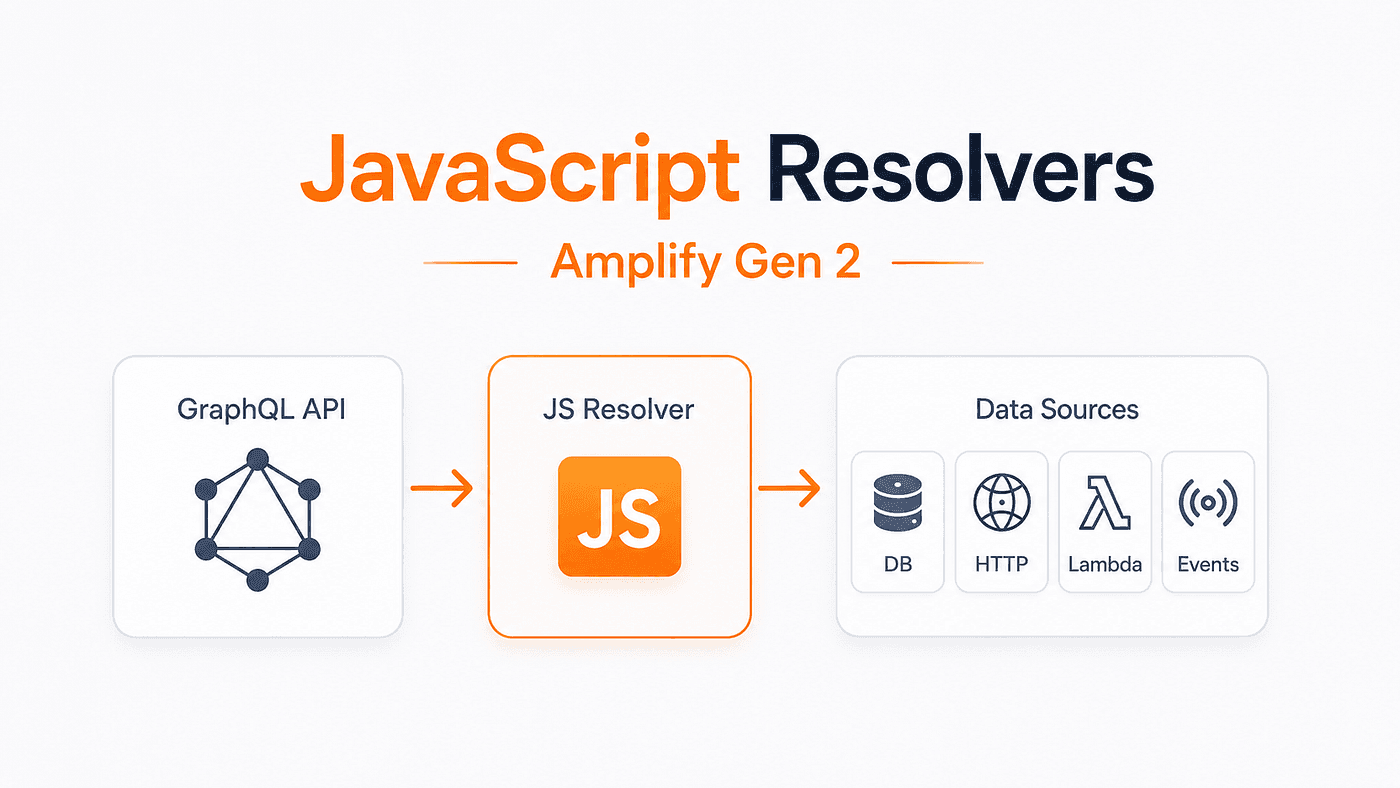
This is a good use case for an AppSync JavaScript resolver.
In this article, we will build that likePost mutation from start to finish and use it to understand how JavaScript resolvers fit into an Amplify Gen 2 backend.
What is a JavaScript Resolver?
A GraphQL schema can tell you what the client is allowed to request, but it does not automatically know how that request should be executed.
Consider the following mutation:
mutation LikePost {
  likePost(postId: "post-123") {
    id
    title
    likes
  }
}
The schema can define that likePost accepts a postId and returns a Post.But the schema alone does not know that the likes attribute should be incremented in DynamoDB.That is the resolver’s job. A resolver sits between the GraphQL field and a configured data source. In a JavaScript resolver, the request handler receives information about the GraphQL request and returns instructions for the data source. After the data source finishes the operation, the response handler receives the result and returns the value expected by GraphQL.
For our example, the flow is:
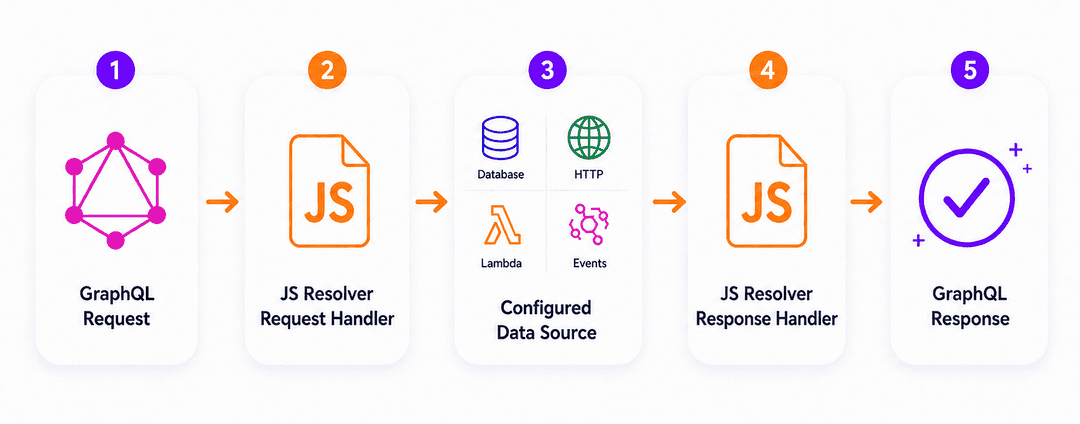
The important part is that the resolver is not creating a DynamoDB SDK client and making the API request itself.
It describes the DynamoDB operation, and AppSync performs that operation against the configured data source.
How JS Resolvers Fit into Amplify Gen 2?
Amplify Gen 2 automatically creates many GraphQL features for you. When you define a data model, Amplify provisions the GraphQL API, creates the DynamoDB tables, configures authorization, and generates the common operations needed to work with your data.
import { type ClientSchema, a, defineData } from '@aws-amplify/backend';
const schema = a.schema({
  Post: a
    .model({
      title: a.string().required(),
      content: a.string(),
      likes: a.integer(),
    })
    .authorization((allow) => [allow.authenticated()]),
});
export type Schema = ClientSchema<typeof schema>;
export const data = defineData({
  schema,
});
From this definition, Amplify generates the standard model operations you would expect, such as create, get, list, update, and delete. These generated APIs should usually be your first choice because they cover common CRUD use cases without adding extra resolver code. Custom resolvers become useful when the behavior you need is more specific than those generated operations. That might be an atomic update, a custom DynamoDB query, a conditional write, a request to an HTTP API, an EventBridge operation, or some response transformation.
Amplify Gen 2 lets you define a custom query or mutation and connect it to an AppSync JavaScript resolver using a.handler.custom().
How an AppSync JavaScript Resolver Works?
A JavaScript resolver usually contains two functions: request and response.
export function request(ctx) {
  // Build the request sent to the data source.
}
export function response(ctx) {
  // Handle and return the data-source result.
}
The request function runs first and receives the resolver context (ctx), which contains information about the GraphQL request, including the arguments provided by the client. Its job is to create the request that AppSync will send to the configured data source.
After the data source completes the operation, AppSync executes the response function. The result returned by the data source is available through ctx.result, while any error is available through ctx.error. The response function can return the result directly, transform the data, filter fields, or handle errors before sending the final response back to the client.
Building Your First JavaScript Resolver?
Now that the basics are clear, let’s build a simple example step by step. We will create a custom mutation called likePost. When the client sends a post ID, the resolver will increase the likes value by 1 and return the updated post.
Step 1: Define the Post Model
Start with a normal Amplify Data model:
import { type ClientSchema, a, defineData } from '@aws-amplify/backend';
const schema = a.schema({
  Post: a
    .model({
      title: a.string().required(),
      content: a.string(),
      likes: a.integer(),
    })
    .authorization((allow) => [allow.authenticated()]),
});
export type Schema = ClientSchema<typeof schema>;
export const data = defineData({
  schema,
});
Step 2: Add the likePost Mutation
Next, add a custom mutation to the schema:
import { type ClientSchema, a, defineData } from '@aws-amplify/backend';
const schema = a.schema({
  Post: a
    .model({
      title: a.string().required(),
      content: a.string(),
      likes: a.integer(),
    })
    .authorization((allow) => [allow.authenticated()]),
  likePost: a
    .mutation()
    .arguments({
      postId: a.id().required(),
    })
    .returns(a.ref('Post'))
    .authorization((allow) => [allow.authenticated()])
    .handler(
      a.handler.custom({
        dataSource: a.ref('Post'),
        entry: './resolvers/dynamodb/like-post/like-post.ts',
      }),
    ),
});
export type Schema = ClientSchema<typeof schema>;
export const data = defineData({
  schema,
});
You can read this mutation almost like a sentence: create a mutation called likePost, require a postId, return a Post, allow authenticated users to call it, and use the custom resolver defined in ./resolvers/dynamodb/like-post/like-post.ts.
The most important part is the handler:
.handler(
  a.handler.custom({
    dataSource: a.ref('Post'),
    entry: './resolvers/dynamodb/like-post/like-post.ts',
  }),
)
dataSource: a.ref('Post') tells AppSync to use the data source behind the Post model. The entry value points to the resolver implementation. This keeps the schema focused on the GraphQL contract, while the resolver file contains the actual backend logic.
Step 3: Organize the Resolver by Data Source
Instead of placing every resolver directly inside one folder, it is cleaner to organize them by data source. For this example, the resolver uses DynamoDB, so the structure can look like this:
amplify/
└── data/
    ├── resource.ts
    └── resolvers/
        └── dynamodb/
            └── like-post/
                └── like-post.ts
This structure becomes especially useful as the project grows. If you later add HTTP, EventBridge, or other resolver types, each one can live under its own data-source folder.
For example:
resolvers/
├── dynamodb/
│   ├── like-post/
│   │   └── like-post.ts
│   ├── get-post/
│   │   └── get-post.ts
│   └── list-posts/
│       └── list-posts.ts
│
├── http/
│   └── get-external-user/
│       └── get-external-user.ts
│
└── eventbridge/
    └── publish-post-created/
        └── publish-post-created.ts
This makes it easier to understand what each resolver talks to and keeps related operations together.
Step 4: Create the Resolver Logic
Now add the resolver implementation inside:
amplify/data/resolvers/dynamodb/like-post/like-post.ts
The resolver can look like this:
import { util } from '@aws-appsync/utils';
export function request(ctx) {
  return {
    operation: 'UpdateItem',
    key: util.dynamodb.toMapValues({
      id: ctx.args.postId,
    }),
    update: {
      expression: 'ADD likes :increment',
      expressionValues: {
        ':increment': {
          N: 1,
        },
      },
    },
  };
}
export function response(ctx) {
  if (ctx.error) {
    util.error(ctx.error.message, ctx.error.type);
  }
  return ctx.result;
}
The easiest way to understand this code is to follow what happens during the request. The client sends a postId, and the resolver reads it from ctx.args.postId. It then builds a DynamoDB UpdateItem request for that specific post.
How Does the request Handler Work?
The first function AppSync runs is request().
export function request(ctx) {
AppSync passes the resolver context object into the function as ctx.For this mutation, the client provides:
likePost(postId: "post-123")
So the resolver can access that value through:
ctx.args.postId
The resolver then builds an UpdateItem operation:
return {
  operation: 'UpdateItem',
This does not execute DynamoDB directly.It tells AppSync which operation should be performed against the configured DynamoDB data source.
The next part identifies the record:
key: util.dynamodb.toMapValues({
  id: ctx.args.postId,
}),
util.dynamodb.toMapValues() converts normal JavaScript values into DynamoDB attribute values.
Then we define the actual update:
update: {
  expression: 'ADD likes :increment',
  expressionValues: {
    ':increment': {
      N: 1,
    },
  },
},
The DynamoDB ADD expression increments the numeric likes attribute by 1.There is another useful behavior here. If the post exists but does not yet have a likes attribute, DynamoDB treats the initial numeric value as 0. The first call therefore makes the value 1.But there is an important edge case that is easy to miss.
DynamoDB UpdateItem can create a new item when no item exists for the supplied key. Without an additional check, calling likePost with an unknown post ID could therefore create an incomplete item instead of failing.
That is why the example includes:
condition: {
  expression: 'attribute_exists(id)',
},
The update succeeds only when the item already has an id attribute, which means the post exists.AppSync supports condition expressions for DynamoDB PutItem, UpdateItem, and DeleteItem operations. When the condition fails, the mutation is rejected by default.For a tutorial example, this small condition makes the behavior much safer and closer to what a likePost operation normally means.
How Does the response Handler Work?
Once DynamoDB finishes the operation, AppSync calls:
export function response(ctx) {
The data source result is available through:
ctx.result
AWS AppSync automatically converts the updated DynamoDB item into normal GraphQL and JSON-compatible values before making it available to the response handler.
Our handler first checks for an error:
if (ctx.error) {
  util.error(ctx.error.message, ctx.error.type);
}
If the DynamoDB request failed, util.error() stops resolver evaluation and returns a GraphQL field error.
If everything succeeded, we simply return:
return ctx.result;
That returned value must match the GraphQL type declared by:
.returns(a.ref('Post'))
This is the basic resolver pattern you will see repeatedly:
GraphQL arguments
      ↓
request(ctx)
      ↓
Data-source operation
      ↓
response(ctx)
      ↓
GraphQL result
Step 5: Call the Mutation from the Frontend
Amplify generates a typed frontend API for queries and mutations. Once the backend has been deployed and the client configuration is available, the mutation can be called through client.mutations.
const { data, errors } = await client.mutations.likePost({
  postId: 'post-123',
});
The frontend does not need to know that this operation uses a custom JavaScript resolver or an atomic DynamoDB update. It only needs to understand the GraphQL contract: the mutation accepts a post ID and returns a post.
What Does the Resolver Context Object Contain?
The resolver context object, usually written as ctx, gives your resolver access to information about the current GraphQL request and execution. It contains the input sent by the client, caller identity, results returned by the data source, errors, and values shared across pipeline steps.
ctx.args
Use ctx.args to read the arguments sent by the client.
const postId = ctx.args.postId;
For larger operations, it can also contain filters, pagination values, input objects, and optional parameters.
ctx.identity
ctx.identity contains information about the caller, depending on the configured authorization method.
const userId = ctx.identity?.sub;
You can use it for owner checks, tenant filtering, or other access-control logic.
ctx.result
ctx.result contains the value returned by the configured data source after executing the request function.
return ctx.result;
Its structure depends on whether the resolver is connected to DynamoDB, Lambda, HTTP, EventBridge, or another source.
ctx.error
If the data-source operation fails, the error is available through ctx.error.
if (ctx.error) {
  util.error(ctx.error.message, ctx.error.type);
}
This lets you return a meaningful GraphQL error to the client.
ctx.source
ctx.source contains the value returned by the parent GraphQL field and is mainly useful for nested resolvers.
const authorId = ctx.source.authorId;
ctx.stash
ctx.stash lets you temporarily store values during one resolver execution.
ctx.stash.userId = ctx.identity.sub;
This is especially useful in pipeline resolvers where multiple functions need to share data.
ctx.prev.result
In a pipeline resolver, ctx.prev.result contains the result returned by the previous function.
const previousResult = ctx.prev.result;
Together, these properties give the resolver the context it needs to understand the request, interact with the data source, and pass information through the execution flow.
What Can a JavaScript Resolver Connect To?
Our example uses the DynamoDB data source already associated with the Post model.Amplify can also work with additional AppSync data sources. Current Amplify Gen 2 documentation lists Amazon DynamoDB, AWS Lambda, Amazon RDS databases using the Data API, Amazon EventBridge, OpenSearch, and HTTP endpoints as supported data-source options for custom operations.
- DynamoDB resolvers map incoming queries to a DynamoDB request object.
- HTTP resolvers tell AppSync exactly how to make an external HTTP call.
- EventBridge resolvers format the event data to push to a bus.
The resolver itself is not meant to behave like a general-purpose backend server. Its single purpose is mapping GraphQL executions to data-source operations.
How Does the APPSYNC_JS Runtime Work?
Even though AppSync resolvers are written in JavaScript, they do not run in the same environment as a normal Node.js application or Lambda function. Instead, they run inside AWS AppSync’s own APPSYNC_JS runtime, which is designed specifically for resolver logic.
The easiest way to think about it is that a resolver is not a small backend server. You normally do not create AWS SDK clients, access files, or open network connections directly. Instead, you describe the operation you want AppSync to perform, and AppSync sends that request to the configured data source for you.
For example, instead of creating a DynamoDB client like this:
import { DynamoDBClient } from '@aws-sdk/client-dynamodb';
const client = new DynamoDBClient({});
you return a DynamoDB operation from the resolver:
export function request(ctx) {
  return {
    operation: 'GetItem',
    key: {
      id: {
        S: ctx.args.id,
      },
    },
  };
}
So a simple way to remember the difference is: Lambda gives you a full application runtime, while APPSYNC_JS gives you a lightweight environment focused on handling GraphQL requests and talking to configured data sources.
JavaScript Resolver or Lambda?
Both JavaScript resolvers and Lambda functions can handle custom GraphQL operations, but they are useful in different situations. In my experience, resolvers are a good fit when the operation can be completed with a small and predictable sequence of data-source actions without needing a full runtime.
For example, a resolver works well when the flow is something like creating an item, reading related data from another table, updating a second table, and returning the result. The important point is that you already know how many data-source actions need to happen. The same idea applies to common scenarios such as incrementing a counter, applying a conditional update, querying a secondary index, calling an HTTP endpoint, publishing an EventBridge event, enforcing tenant-based access, or reshaping a response before returning it to the client. Because the workflow is known and controlled, these operations can often be handled cleanly with AppSync resolvers or pipeline resolvers without adding the extra overhead of Lambda.
The limitation appears when the number of operations is not known in advance. DynamoDB pagination is a good example. If you need to keep querying until LastEvaluatedKey becomes empty and process every page in a single backend execution, you do not know beforehand how many data-source calls will be required. That kind of iterative workflow is usually better suited to Lambda.
A resolver is still a good fit when you can process one page at a time and return the pagination token to the client for the next request. In that case, each resolver execution stays short and predictable. So the decision is less about “simple versus complex” and more about whether the workflow itself is predictable.
Use a resolver when the number of data-source actions is known and the flow is short and controlled. Use Lambda when the operation requires repeated processing, runtime-controlled loops, external dependencies, or a workflow where the number of actions is not known in advance.
How Do Unit and Pipeline Resolvers Work in AppSync?
The likePost example is effectively a simple one-data-source operation.One GraphQL mutation maps to one DynamoDB operation, then the result is returned.
AppSync also supports pipeline resolvers for workflows containing multiple AppSync functions executed in sequence. Each function can interact with a data source, and the result of one step can be passed to the next through values such as ctx.prev.result. ctx.stash can be used to share additional state across the pipeline.
This is useful when a workflow is still predictable but requires several controlled data-source operations.For example, you may need to validate some input, retrieve related data, perform another data-source operation, and then shape the final response.
How Should You Test and Debug JavaScript Resolvers?
Even small resolver files can fail because of invalid input, an incorrect AppSync request structure, unsupported runtime behavior, or unexpected data from the backend. It is worth testing both the request and response functions with different ctx values before relying on the resolver in production.
Focus on the cases that are most likely to break the flow: invalid arguments, authorization failures, missing records, conditional write failures, and unexpected data-source responses. Tools such as the AppSync resolver test environment and @aws-appsync/eslint-plugin can also help catch problems earlier.
What Is the Easiest Way to Think About a Resolver?
After looking at schemas, context objects, DynamoDB request formats, and runtime limitations, JavaScript resolvers can sound more complicated than they really are.
For most resolver work, I come back to two questions:
- What request should AppSync send to this data source?
- What response should the GraphQL client receive?
For likePost, the answers are straightforward. AppSync should send an UpdateItem request that increments the likes for an existing post, and the GraphQL client should receive the updated Post. Everything between those two points is just mapping the GraphQL execution to the data-source operation and then mapping the result back.
Once you get comfortable with that model, writing additional resolvers becomes much easier.
Final Thoughts
JavaScript resolvers are useful when you need custom backend behavior without introducing a full Lambda function for every operation. They are especially effective when the flow is short, predictable, and closely tied to a supported AppSync data source.
For the first implementation, the most important thing is to understand the request-and-response pattern and how ctx carries data through that flow. Once that becomes familiar, it becomes much easier to decide when a resolver is the right fit and how to structure more advanced resolver logic.