If you have a production application running on any cloud platform, you must think of automating the cloud infrastructure.
Infrastructure automation brings many benefits, including faster disaster recovery (lowering the RTO), preventing human errors, fast deliveries, etc.… In AWS, we use AWS CloudFormation to automate our cloud infrastructure using CloudFormation templates written in JSON or YAML.
In this blog post, let us discuss a better way of automating AWS infrastructure using AWS CDK.
By the end of this blog post, you will know how to provision and deploy a complete react application with a REST API backend using CDK.
What is AWS CDK?
AWS CDK provides a library of constructs in many programming languages to easily automate AWS infrastructure. In addition, these constructs can be customized and be used to provision your application as required.
Wait.. Don’t we already have CloudFormation for this purpose? So why should I use CDK instead of CloudFormation?
Yes. You are correct. AWS CDK converts the code written in the supported programming languages to CloudFormation Script before executing them.
So what are the benefits of using AWS CDK instead of raw CloudFormation templates?
Top 5 benefits of AWS CDK
AWS CDK offers many benefits. Out of them, here are the top five benefits that caught my eyes.
1. Ability to choose a programming language of your choice
We all have a preferred programming language that we are comfortable with. AWS CDK currently supports JavaScript, TypeScript, Python, Java, C#, and Go programming languages. So you can pick your preferred programming language and start provisioning your application infrastructure with minimum code.
One of the main advantages of using a programming language over JSON or YAML is that we can use programming constructs when building the infrastructure.
For example, you can use if-then-else logic to selectively provision infrastructure based on different criteria. You can also use loops to execute a sequence of instructions until a certain condition is met.
2. Ability to use auto-complete and inline documentation
Another perk of using a programming language is that you get autocomplete and inline documentation while coding the infrastructure. This saves a lot of time as you don’t have to refer to documentation often.
3. Ability to execute runtime code with the infrastructure code
Now you don’t have to separate your infrastructure automation code from your application code. CDK links both of these types of codes which is really cool.
For example, you can provision an S3 bucket with static web hosting enabled and associate the HTML/JavaScript/CSS application code in the CDK code itself.
4. Ability to pick higher-level constructs to build your apps
AWS CDK supports 3 types of constructs. Namely Level1, Level2, and Leve3. You can choose one or more of these constructs to build your CDK app.
Level 1 (L1) construct
These are direct representations of CloudFormation resources. When you choose L1 constructs you must provide all the required CloudFormation attributes for a particular cloud resource.
Level 2 (L2) construct
A Level 2 construct also represents a particular cloud resource. E.g. An S3 bucket. But you don’t have to configure every configuration attribute. Instead, they are provided with convenient default values such that you can easily spin up a certain cloud resource.
Level 3 (L3) construct
A Level 3 construct represents a bunch of cloud resources that work together to accomplish a particular task. They are also called “patterns”. For example, you can create an ApplicationLoadBalancedFarageteService which will create an ECS cluster powered by Fargate, an ECR repository to host your Docker images, Application Load Balancer to access your containers, etc…
In addition to that, AWS best practices are baked into these patterns so that you can use them for production use directly.
5. Ability to use a developer-friendly CLI
Last but not least, AWS CDK comes with a developer-friendly CLI.
You can use the CLI to initiate a CDK project with your preferred programming language, Bootstrap the project with your AWS Account, Deploy the CDK App, Check the resource diff for subsequent CDK deployments, etc…
Let’s Build an App with CDK :)
Now that we know about CDK, let’s build a CDK app. In order to learn anything new, we should have some hands-on experience. :)
You can follow the steps below to provision cloud resources to deploy a web app that has got a containerized API backend using AWS CDK.
Step 01 — Prerequisites
Before we start we need to install AWS CLI. Visit this link and follow the instructions to install AWS CLI for your operating system. After that, you should create IAM user with Administration permissions in the AWS Console and configure the user credentials in your computer using aws configure command.
For the rest of this blog post, We are going to use TypeScript to provision cloud resources using CDK. Therefore make sure you have NodeJS (>= 10.3.0) installed on your computer as well. NodeJS installation is going to install the Node Package Manager(npm) which is needed to install CDK toolkit
Installing CDK toolkit
npm install -g aws-cdk
Execute the above command to install CDK globally on your computer. In order to verify the installation, issue the following command.
cdk --version
// the version used for this example: 1.105.0 (build 4813992)
Step 02 — Initializing a CDK project
Now let’s create a new CDK project using the CDK cli. I’ll create a new directory and issue the cdk init command.
// Creating a new directory and change into that directory
mkdir cdk-demo
cd cdk-demo
// Initializing a cdk typescript project
cdk init --language typescript
Okay, we initialized a TypeScript project. Now we can start coding our infrastructure in TypeScript.
In order to compile TypeScript to JavaScript, make sure to run npm run watch command in a separate terminal/command prompt tab.
Application Overview — A Fibonacci Generator
We are going to build a Fibonacci generator!
The frontend react application will provide input for the users to enter the desired Fibonacci number and the backend REST API will return the value for the requested number. It’s a simple application.
Let’s build a scalable architecture for this simple app, in case hundreds of users start requesting Fibonacci numbers :) :)
Here is the architecture that we are going to build for this app. This architecture can be used for similar applications with a SPA frontend and a containerized backend.
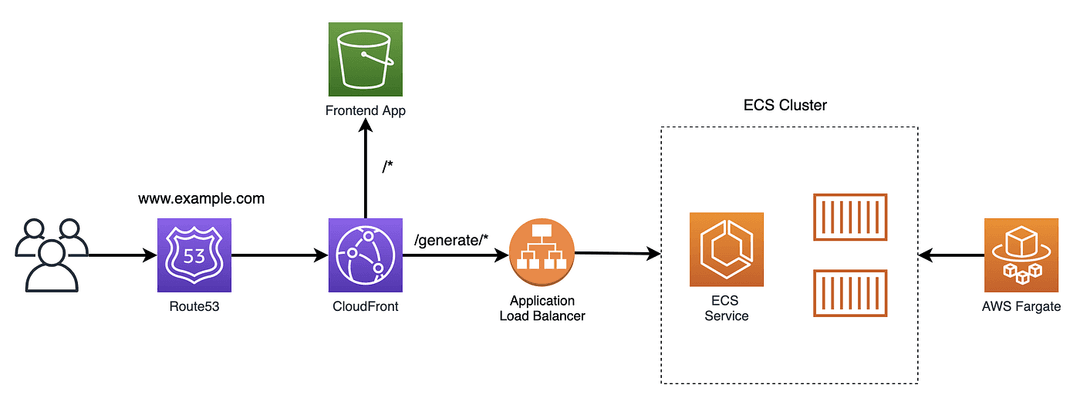
The containerized Fibonacci generator backend is dockerized and deployed as containers in an ECS cluster. ECS cluster is powered by AWS Fargate and a number of containers are managed by the ECS service.
The container API is exposed to the outside world through an Application Load Balancer(ALB) and that ALB is configured as a custom origin to a CloudFront distribution. The same CloudFront distribution has an S3 origin which points to the S3 bucket that has the React frontend code.
Finally, the user requests are forwarded to the CloudFront distribution from Route53, which is the DNS service of AWS.
Step 03 — Building the Backend REST API
Alright, let’s build our backend API first and then provision the related cloud resources with CDK.
Let’s create a folder called backend at the root directory level. The backend API code is added inside that folder.
Note: You can find the application code here.
In order to build the API, we are going to use ExpressJS. Here is the ExpressJS API code. Note that I have added a health check endpoint, such that the Load balancer can call this endpoint to ensure the container that runs this API is healthy. (We are going to dockerize this API). Also, note that there is a route /generate/:number which will return the value of the given Fibonacci number.
Okay, now we need to Dockerize this ExpressJS API. Here is the Dockerfile that creates a docker image of this ExpressJS API.
Step 04 —Provisioning the Backend As Code
Now that we have the application code for the backend, let’s create related services and deploy them to AWS using AWS CDK.
At the root level of the CDK project we created earlier, you should find the lib folder. Let’s create a file called, fargate.ts inside this folder.
FargateDemoStack is the first CDK stack associated with our application. As you can see, it’s going to provision the VPC for our ECS cluster and the ApplicationLoadBalancedFargateService level 3 construct will create a docker image from the backend code and provision the following resources.
- ECR repository to upload the docker image
- Associate AWS Fargate serverless compute engine with the ECS cluster
- ECS Service that manages desired number of docker containers
- Application Load Balancer(ALB) that direct traffic to containers via dynamic port mapping
Note that optionally you can pass environment variables to your containers if you need.
Finally, the above FargateDemoStack exports the domain name of the ALB so we can import it from a different CDK stack.
Step 05 — Building the Frontend React App
So far, we created our backend API and created the FargateDemoStack to provision and deploy the backend to AWS. Now let’s focus on our frontend.
Let’s use create-react-app to quickly scaffold a react application in a folder called frontend at the root directory level.
npx create-react-app frontend
The App.js file will include a very basic UI and handler code for the Fibonacci frontend.
Here we have an input box that captures the user requested Fibonacci number. When a user clicks the submit button, a backend request is sent to the backend to get the value. Finally, the value is showed in the UI.
Note that how used the https://�18�/generate/�19� path pattern to match with the CloudFront behaviour path pattern such that the request is directed to a container by the Load balancer.
Step 06 — Provisioning the Frontend As Code
At the root level lib folder of the CDK project, Let’s create another file called, cloudfront.ts.
In this file, we are going to provision a CloudFront distribution and associate the S3 origin and ALB origin with it.
This CDK stack is called CloudFrontDemoStack. It does several things. Let’s briefly go over that.
- Importing ALB domain name from CloudFormation. This domain name is used to create the custom origin for the CloudFront
- CDK can also refer to already existing cloud resources in AWS. In this case, I have already created SSL certificate from the AWS console. Therefore I can add the Arn(Amazon Resource Name) of the SSL certificate in the cdk.json file and refer to it in any CDK stack.
- Creating an Origin Access Identity(OAI) for CloudFront and associate the OAI for the S3 origin. It will restrict the direct access to the S3 bucket and tighten the security.
- Adding the S3 origin as the default behavior of the CloudFront distribution.
- Adding the /generate/* path pattern as a custom behavior that points to ALB origin in the CloudFront distribution.
Step 07 — Deploying the Infrastructure to AWS
Finally, we ended up with two CDK stacks, that deploy both infrastructure and the application code to AWS. So how are we going to deploy it?
We can update the bin/cdk.ts file to execute both of those CDK stacks when running cdk deploy
Before deploying the stack with cdk deploy make sure to issue cdk bootstrap command so that CDK CLI will create the necessary CDK assets in AWS before the deployment.
You can also synthesize the CDK app with cdk synth command. It will make sure the CDK code can be compiled to the CloudFormation template without errors.
Finally, issue cdk deploy to provision the cloud resources and deploy the application code to AWS.
Bonus-Tip
You can use CDK Pipelines to deploy CDK applications as and when the code changes are committed to a Github repo. CDK Pipelines is a high-level construct library that makes it easy to set up a continuous deployment pipeline for your CDK applications.
I hope this article helps you in getting started with CDK.
Cheers!
References
☕ Support My Work
If this article helped you, consider buying me a coffee to support more practical AWS content. 👉 [https://buymeacoffee.com/mjmrz�28�
🔗 Connect with Me
- LinkedIn: [http://www.linkedin.com/in/mjmrz�29�
- YouTube: [https://www.youtube.com/@EnlearAcademy�30�